 Windows NT 4.0 Configuration Guide
This document outlines the process required to configure Windows NT 4 for a dial-up connection to Netro. It has been designed to cover the standard installation, and may not cover all configuration scenarios. Please email any feedback to support@netro.com.au.
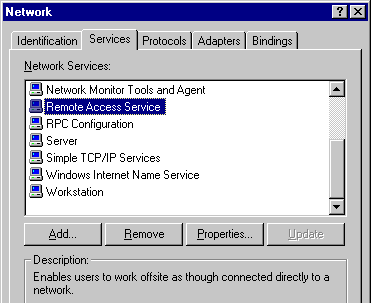
This will show you a list of all the networking services that are currently installed on your system as shown.
If Remote Access Service is not listed, you will need to install it by clicking the add button, selecting Remote Access Service and clicking on OK. At this point you will require your Windows NT 4 CD to install the necessary files. Your system may also need to reboot, if it does, then get back to this screen Start, Settings, Control Panel, Network, to configure RAS.
Configuring Remote Access
If NT doesn't detect your modem (or selects a standard modem type) you may need to manually select your modem type. Browse through the list for your manufacturer and model type. If your modem is not there, just select the standard modem as your modem type, being sure to select the appropriate one for your modem speed. Make sure it is installed to the correct COM port. NT should automatically detect the right port.
You should then be back to the "Remote Access Setup" screen. Click on the configure button, and select the "Dial out only" option, or "Dial Out and Receive Calls" if you intend to also set up your system to receive calls.
Click on OK, then select the "Network.." button. Make sure that only TCP/IP is checked then click on OK.
Next, click on Continue. NT may ask about NETBEUI configuration. Click on OK, as this is not important to configuring a connection to Netro. If Windows NT prompts you to reboot, do so.
Creating a Dialup Networking connection.
Configuring the Dial-up Connection
Next, select the Server tab. The dialup server type should by "PPP, Windows NT, Windows 95 Plus, Internet", and the only allowed network protocol should be TCP/IP.
Click on the TCP/IP Settings button and make sure the settings in the "PPP TCP/IP Settings" window are the same as shown. IP header compression optimizes data transfer between computers, If you experience a lot of problems connecting, or experience frequent drop outs, then try disabling this option.
Netro automatically assigns DNS servers, no need to enter these details
manually. Click on OK again, then finally OK one more time to finish editing.
The default settings are used for any option not covered in this guide.
How to Logon and logoff
Configuring Internet Explorer (Web browser)
Tick the Enable proxy server box, and type in the box below proxy.netro.com.au:8080. Click on OK.
Double-Click on the Internet icon. Clear the dialog box at the top of the screen, and type "http://www.netro.com.au/" (this should bring up the Netro home page). From the toolbar, select View, Options. Select the Start and Search Pages, and click on the Use Current button. Repeat the same process for the Netro Search Page: "http://www.netro.com.au/sites/search/" (select OK when done). This will configure your browser to use Netro as the Home and Search pages. Click the home icon on the toolbar to load the Netro home page.
Congratulations, you are now on the Internet.
Going further Installing TCP/IP and Remote Access
Before you can connect to Netro, you must first install the TCP/IP protocol and Remote Access Services (RAS) onto your system. You will require Administrator privileges for this section. To check if TCP/IP is already installed, click on Start, Settings, then Control Panel. Double-click the Network icon, and select the Protocols tab. If "TCP/IP Protocol" is not listed, then install it by clicking on the Add button and selecting it from the list. Once TCP/IP has been successfully installed (you may need the Windows NT 4 CD) then click on the Services tab.
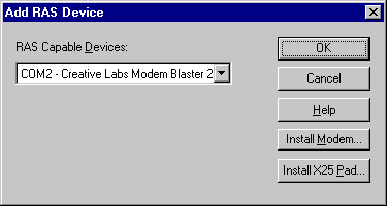
Once RAS in installed you will need to configure it to use your modem. Highlight the Remote Access Service entry in the Control Panel, Network, Services tab, then click Properties. You'll see a window titled "Remote Access Setup". Click on the Add button to bring up the "Add RAS device" window.
If you already have a modem installed on your computer, then select it from the drop down list. Otherwise, click on the Install Modem button, and then click on Next to let NT look for a modem.. Make sure the modem is connected properly and turned on. Follow the instructions as prompted.
Now you're ready to set up a connection to Netro. Double-click on My Computer, then double click on Dial-Up Networking. If you have not previously set up any phonebook entries, then NT will start up the "New Phonebook entry Wizard". Type in a name for your connection, and select the "I know all about phonebook entries..." option then click on Next.
If you have previously set up a phonebook entry, then you can get to the same screen by clicking on New from within the properties of your current entry.
At this stage you will be prompted to give the details for your Netro connection. The first tab, "Basic" contains general information about the connection. Type in a name for your connection (e.g.
netro) and fill in the phone number (eg Sydney POP = 9925 5800). The information for your modem should already be in place here, if necessary you can select the Configure button to set the modem speed and advanced features.
Now that everything's been set up, you're ready to connect! Simply click on the Dial button in the Netro Dial-Up connection properties and click on OK for your modem to begin dialing. Don't worry about filling in any of the fields here, your username and password are entered once the black terminal window shows up. Once your name and password is validated by our server, your are ready to start your web browser. ![]() NT 4 has a Dialup monitor, which will appear on your taskbar. Select Hangup from the options here to end your session.
NT 4 has a Dialup monitor, which will appear on your taskbar. Select Hangup from the options here to end your session.
NT 4 comes with Microsoft Internet Explorer. To configure it, Right-click on the Internet icon on your desktop, and select Properties.
Internet Explorer allows you to access the WWW, FTP &, Gopher. Take the time to get familiar with the Netro home pages. You will find a wealth of information & links to other sites. If you run into any difficulties, use the Online Help under NT and Internet Explorer, and have a look at the Netro web page for answers to common questions, and configuration guides for popular Internet software.