Setting up the Netro connection.
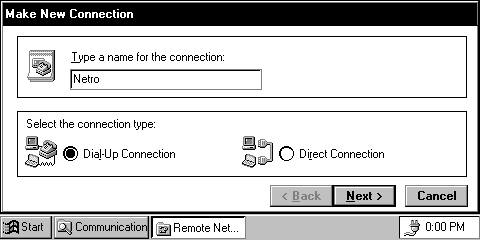
You should then see a screen similar to the one below. Enter "Netro" as the name you'd like to use for this connection, and tap the Dial Up Connection button. Tap on Next.
![]() This guide will show you step by step on how to configure Windows CE for Web and Email access through Netro. You will also need a PCMCIA modem card that will work with your HPC. Check the hardware manual for local Bulletin Board numbers that you can use to test your card before following this guide.
This guide will show you step by step on how to configure Windows CE for Web and Email access through Netro. You will also need a PCMCIA modem card that will work with your HPC. Check the hardware manual for local Bulletin Board numbers that you can use to test your card before following this guide.
 Connect your modem to your HPC, then turn the HPC on. Tap Start, Programs, then double-tap on the Communications folder. Within this folder, you should see an icon labled Remote Communications. Double-tap that icon, and then double-tap on "Make New Connection".
Select you modem from the drop-down menu (Hopefully, Windows CE auto-detected your modem and has it already listed in the drop-down box), and enter in your local Netro phone number. (See the Configuration Summary for available numbers).
Now tap the Configure button, and check that your Baud Rate is higher than the speed of your moddem. Tap on OK.

Tap on OK, then Finish when ready.
![]() You are now ready to connect to Netro. Double-tap on the Netro icon, fill in your user name and password, and connect. You may wish to create a shortcut to Netro on your desktop. To do this, select the Netro icon, tap on the File menu and select Desktop Shortcut.
You are now ready to connect to Netro. Double-tap on the Netro icon, fill in your user name and password, and connect. You may wish to create a shortcut to Netro on your desktop. To do this, select the Netro icon, tap on the File menu and select Desktop Shortcut.