Netro Support: SSH (Secure Shell)
Table
- Client
- Key Generation
- Uploading Public Key
- Settings
- Agent
- Local Port Forwarding
- Port Numbers
- Key fingerprint
Overview
Netro provides secure access via SSH (Secure Shell) public key authentication and port forwarding to services such as:
- SFTP (SSH File Transfer Protocol) also known as Secure FTP.
- Microsoft SQL Server (port 1433)
- MySQL (port 3306)
- RDP (Remote Desktop Protocol) port 3389
- VNC
Before you can login for the first time, you will need to generate a key pair and upload the OpenSSH public key.
SSH client
Windows:
Download & install putty-0.70-installer.msi or later.
Warning: Previous versions have various security vulnerabilities.
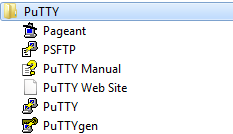
Once installed, you should see a PuTTY program group under the Windows Start button
Linux:
Make sure you have the latest version installed for your distribution, useful commands:
- Ubuntu/Debian:
- apt update; apt upgrade openssh-client
- dpkg -L openssh-client ; dpkg -l openssh-client
- CentOS:
- yum update openssh-clients
- yum list installed openssh-clients ; repoquery --list openssh-clients (requires yum-utils)
SSH Key Generation
Windows:
Run PuTTYgen, generate a public/private key pair.
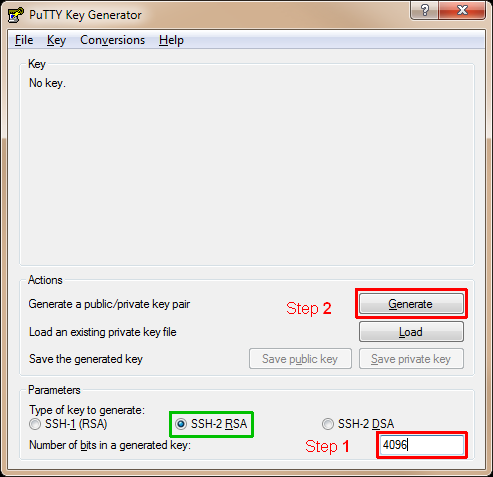
Step 1: Use 4096 bits (not 1024), type of key: SSH-2 RSA (default).
For long term protection, we recommend a keysize of 4096 bits:
Minimum size accepted are 3248 bit public keys (asymmetric cryptography),
providing an equivalent of 128-bits Symmetric encryption as per
Ecrypt II recommendations.
Step 2: Generate a public/private key pair by pressing "Generate", move the mouse around inside the box when instructed.

Step 3: Key Passphrase/ Confirm passphrase
For security, use a passphrase with at least 16 characters, including upper case, numbers & symbols.
Avoid password reuse with other sites, for details visit: Generating & Exchanging Passwords securely
Step 4: Key comment - For convenience use your actual username and serialised date format, e.g.:jsmith-20140616
Step 5: Public key for pasting into OpenSSH authorized keys file: Copy all the text inside the box,
paste into notepad, then save as authorized_keys (no file extension).
Step 6: Save the generated key by pressing "Save private key", save as username-YYYYMMDD.ppk (PuTTY Private Key).
This file should be backed up and kept in a safe place, if compromised replace by generating a new key pair
and replacing the public keys installed on servers.
Step 7: Key fingerprint - Make a record of the fingerprint shown.
Linux:
ssh-keygen -a 128 -b 4096 -o
-a KDF (key derivation function) rounds, e.g. 128 (Default 16?), takes around a second on a modern processor.
-b bits, 3072 or 4096 recommended for RSA keys.
-o OpenSSH format (6.5 or later required).
For more information:
man ssh-keygen
- Wikipedia: ssh-keygen
Uploading Public Key
Existing customers can upload their public key via FTP (until Fri 23/10/15).
New customers can send this via email to support.
In your home directory, simply add the public key to .ssh/authorized_keys
Windows:
You can use FileZilla to edit the file directly on the server.
To view hidden files in FileZilla either:
- Server, Tick: Force showing hidden Files.
- Remote site: /.ssh (change to hidden directory)
Linux:
Use contents from generated ~/.ssh/id_rsa.pub (Caution: Not id_rsa private key).
man sshd
- authorized_keys file format
Settings
Linux:
Use either global or user file:
/etc/ssh/ssh_config
~/.ssh/ssh_config
e.g.:
Port 4
VisualHostKey yes
or provide via command line, e.g.:
ssh -p 4 -o VisualHostKey=yes userid@hostname
-p port Port to connect to on the remote host. This can be specified on a per-host basis in the configuration file.
-o VisualHostKey If this flag is set to yes, an ASCII art representation of the remote host key fingerprint is printed in addition to the fingerprint string at login and for unknown host keys.
For details:
man ssh_config
man ssh
Agent
Windows:
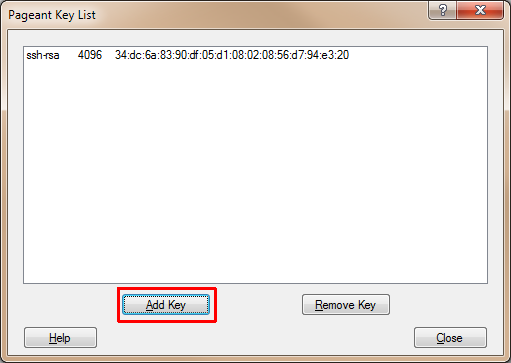
Run Pageant (PuTTY Authentication Agent) to load the private key in memory.
When Pageant has been started, it "hides" itself in the Windows Taskbar notification area (also known as the system tray or status area).
Simply Press "Add Key", point to your username-YYYYMMDD.ppk file and enter your passphrase when requested.
For convenience, add a Pageant shortcut to a Windows Startup Group
using [⊞ Win]-R, shell:startup or shell:common startup.
Linux:
ssh-add
-c Confirmation before being used for authentication.
-l Lists fingerprints.
-L Lists public key parameters.
-E md5 legacy fingerprint hash (instead of sha256).
For more information:
- man ssh-add
- man ssh-agent
Local Port Forwarding:
This section only applies to VPS (Virtual Private Server) or hosting customers using MS-SQL, MySQL, RDP, VNC etc.
Windows:
Run PuTTY, PuTTY configuration shown below, such as accessing management ports via a SSH "tunnel",
this is usually on 127.0.0.1, refer to email originally sent for any specific login, address/ port details etc.
Window (useful for VPS shell access only)
- Column & Rows: e.g. 132 x 43 or 132 x 60 depending on screen size
- Translation: UTF-8
Connection
- Data: auto-login username login name
- SSH: Tick = Don't start a shell or command at all, unless you have a VPS userid with shell access.
Connection, SSH:
- Auth: Private key file for authentication (Useful if you forget to load the private key in Pageant).
- Tunnels: Add new forwarded port, once you click on Add, the entry will be listed under Forwarded ports
e.g. For MySQL, specify: Source Port 3306, Destination 127.0.0.1:3306
Session
- Host name: (same as website or refer to email)
- Port: (refer to email)
- Save Session: e.g. Netro
Remember to Save Session before connecting with Open button.
To open, simply double click your previously saved session.
When logging in, screen should show a banner, followed by something like:
'Authenticating with public key "rsa-key-YYYYMMDD" from agent',
followed by a green cursor. Simply minimise PuTTY and start your relevant remote management program.
When done close PuTTY, or type in exit if you have VPS console access.
Linux:
ssh -L 3306:127.0.0.1:3306 -p 4 -N username@hostname
Port numbers
If running a service locally such as MySQL, change the first (source port) number to an unknown (unused) port of your choosing:
Nmap: Well known service port numbers.
Remember to connect to the remote service via the new source port you have specified.
key fingerprint
If the fingerprint does not match what has been supplied, this could indicate a Man-in-the-middle attack, please take a screenshot, email and contact Netro support, then press cancel, for security do not use.
On a VPS, you can verify the key using:
CentOS: ssh-keygen -lf /etc/ssh/ssh_host_rsa_key
Cygwin: ssh-keygen -lf /etc/ssh_host_rsa_key
Links
PuTTY
OpenSSH
- Manual
Wikipedia: OpenSSH
Wikipedia: Local Port Forwarding
Wikipedia: Public Key Fingerprint
Wikipedia: File Transfer Protocol Security
Related Links
SFTP (SSH File Transfer Protocol)
rsync
Encryption
Generating & Exchanging Passwords securely
Security Resources (See password links)
Remote Admin Tools
Updated May-17